
On completion of this stage you should be familiar with the following concepts:
|
Modeling notions: |
Service vs. Action processes, Automatic transaction support, <Done> exit |
|
Modeling techniques: |
Modeling relational data, Maintaining referential integrity, Chooser based on a composite data structure |
|
Useful process templates: |
Service |
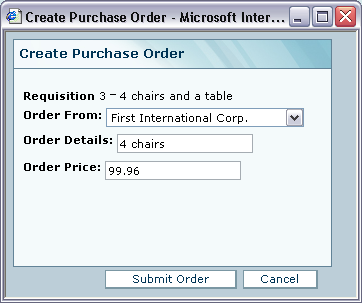
The sample project you have loaded contains modeling of the Create Purchase Order popup user interface:
The selected requisition’s Id and Description.
A Details input field. Initialized with the requisition’s description, in case the purchase order’s content is identical to the requisition. The purchaser may update the purchase requisition details.
A Price input field (the order’s total price).
A Submit Order button, which contains a Close Window process that is not executed since it has no flow attached to it.
If you view the application in the browser, it should look as follows:
The Create Purchase Order popup needs additional modeling:
A Supplier chooser displaying a list of suppliers retrieved from the Supplier database table.
The Submit Order button needs additional modeling to handle database operations: storing the purchase order details entered by the user and updating the requisition to signify that an order has been issued.
This stage’s modeling should be performed in the Tutorial 12-13 project, you imported at the end of the previous stage.
We would like to add a drop-down list displaying a list of suppliers:
Zoom to Create Purchase Order popup.
Add a Display/Row. Name it Supplier Row. Zoom into it.
Add Display/Label. Name it Order From:.
Add Display/Chooser. Name it Supplier.
The Create Purchase Order popup model should look similar to the following:

Recall that when we previously used the Chooser display (to specify requisition urgency), we populated it with text values (“Regular” and “Urgent”) – defined as constants.
This time the values to be displayed in the chooser, the supplier names, must be retrieved from the Supplier table. We will populate Supplier/<Options> with Supplier records we retrieve from the database, and the chooser will automatically display the company name of each supplier (since Company Name is the first text field in the Supplier data structure):
Zoom to the popup's Initialize process.
Add a Database/Find.
Drag a Supplier database record (used in the Manage Suppliers view, Supplier List table) from the outline/repository. Set it repetitive.
Create a flow linking Find/<Records> to the Supplier data structure.
Create a flow linking the Supplier data structure to Create Purchase Order/Supplier Row/Supplier/<Options>.
The Initialize model should look similar to the following:

Notice that while the drop-down list displays only the company name of each supplier, once the user chooses a supplier, Supplier/<Value> will hold the selected supplier’s record in full (we will be interested in the Supplier/<Value>/Id field later), without having to retrieve the details once more from the database.
Save your work, and view the application in the browser. It should look similar to the following:
Now we turn to completing the modeling of the Submit Order button. We shall add a process to the Submit Order button, to handle the database issues mentioned above.
Up to this point in the tutorial, we primarily used the Action template as a container for our modeling. Using Action as a container lets the Tersus runtime engine decide where each of its sub-models is to be executed – on the client or on the server.
In most situations it is obvious where a process should be executed. When its purpose is to display (or reference) user interface elements, it must, and will automatically, execute on the client (browser). Opposite examples are the various database actions, which are always executed on the server.
There are, however, situations where a process can be executed on both tiers, and in these situations, the Tersus runtime engine will execute processes on the client side, unless they are explicitly assigned by the modeler to run on the server. The main factor in the modeler’s decision where a process should be executed is performance. As a rule of thumb, it is a good idea to locate processes manipulating a lot of data or accessing centrally managed data on the server tier. When there is a process with a lot of internal flow of data, and some of its sub-processes are server-side only, it makes sense to perform the whole process on the server, to avoid a lot of traffic between the server and the client.
Aside from performance issues, there are other situations where running a model on the server side is recommended if not imperative. One of these situations is the case of database transactions. When the model performs multiple database operations, such as updates to multiple records in one or more tables in a database and these updates are related to one another, all updates must either succeed or fail, as one.
Tersus provides an automated transaction mechanism. Assigning a process to run on the server ensures that when it is called from a client process, a separate database transaction will be opened. The transaction will be committed if and only if the process is successful (and it will be rolled back if the process is not successful).
To define that a process is to be executed on the server, use the Service template:
Zoom to Submit Order.
Add Basic/Service
(![]() ).
Name it Handle Database. Zoom into it.
).
Name it Handle Database. Zoom into it.
The Handle Database process will include 2 sub-processes, one to handle the purchase order, and the other to handle the requisition’s status update:
Add a Basic/Action. Name it Insert Purchase Order.
Add a Basic/Action. Name it Update Requisition.
The Submit Order button model should look similar to the following:
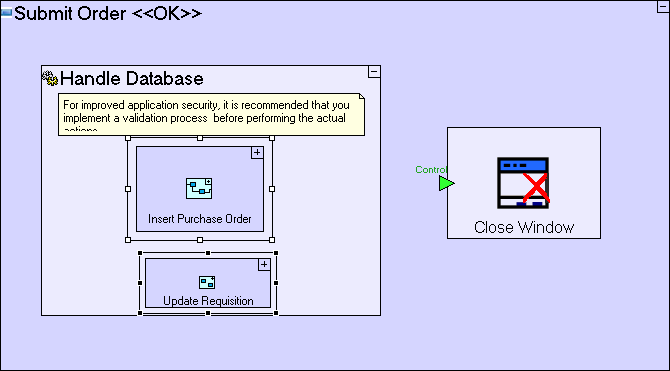
Note that both sub-processes are
based on the generic Action template, and not the Service
template – they will execute on the server, because they are contained in Handle Database, which is a Service.
Both sub-processes do not create
separate transactions. They are included in the parent transaction,
so the insert and update will either both succeed or both fail.
Begin with the definition of the Purchase Order database record:
Zoom into Insert Purchase Order.
Add a Data Types/Database Record. Name it Purchase Order. Zoom into it.
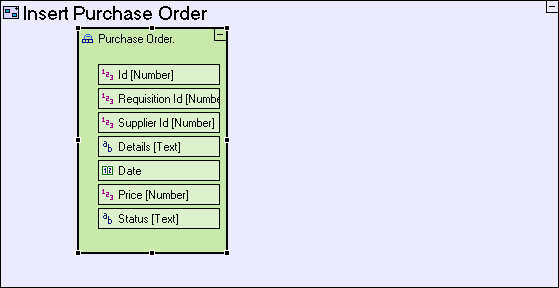
Each purchase order should include the following data:
A unique identifier:
Add Data Types/Number. Name it Id.
The requisition for which the purchase order is issued. We shall store the requisition’s identifier identifying it in the Requisitions table:
Add Data Types/Number. Name it Requisition Id.
The supplier to which the purchase order is issued. We shall store the supplier’s identifier identifying it in the Suppliers table:
Add Data Types/Number. Name it Supplier Id.
Readers inexperienced with relational data models may find it surprising that we are storing the Ids of the Requisition & Supplier, instead of the actual data which will be displayed to the user when referencing a purchase order (in the case of the Supplier table this will usually be Company Name or Contact Name). In fact, this is the correct way to model relational data, since the Id will never change, whereas the details may change frequently (Contact Name is a good example). Once you have the Id at hand, it is very easy to find and display all supplier details.
The details of the purchase order:
Add Data Types/Text. Name it Details.
The date of issuing the order:
Add Data Types/Date.
The price agreed with the supplier:
Add Data Types/Number. Name it Price.
The order’s status (issued or delivered):
Add Data Types/Text. Name it Status.
The Insert Purchase Order model should look similar to the following:
Now that the Purchase Order data structure is defined, we should populate it with the relevant data, part of which comes from the Create Purchase Order popup, so we need to use an Ancestor Reference.
The question is where in the model should this data population process be located?
We might want to place it in the Insert Purchase Order process, but since the process is executed on the server, it cannot reference the popup (a client side element) directly. The solution is to place the ancestor reference in an ancestor process and pass the data to the process through triggers. Since the process’ grandparent (Handle Database) is a Service process, we shall place the ancestor reference in the “great-grandparent” process:
Zoom out to Submit Order.
Add an ancestor reference to Create Purchase Order.
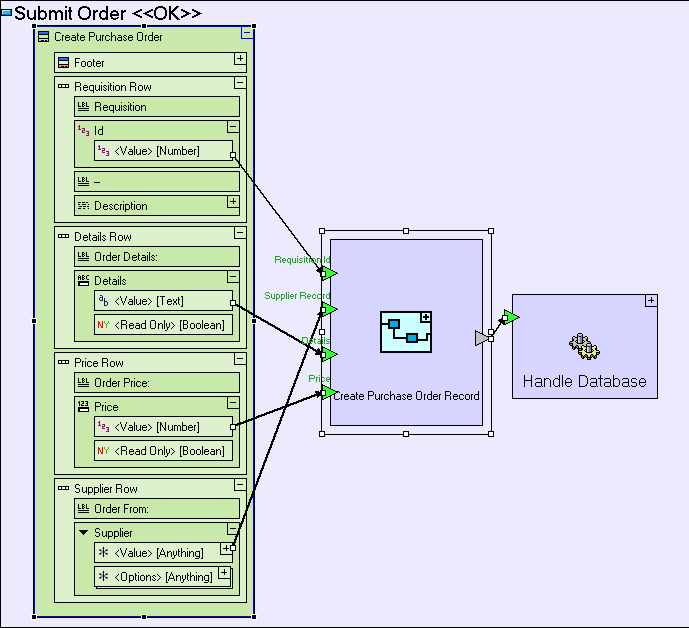
There are four data elements which we need to retrieve from the display: The requisition’s identifier, the chosen supplier’s identifier, the purchase order details, and the price. We shall add a process which creates the database record and passes it to Handle Database and into Insert Purchase Order, so flow and triggers must be defined:
Add a Basic/Action. Name it Create Purchase Order Record.
Add 4 triggers to Create Purchase Order Record. Name them Requisition Id, Supplier Record, Details and Price.
Create the following 4 flows:
|
Source (in Create Purchase Order) |
Target (Create Purchase Order Record trigger) |
|
Requisition Row/Id/<Value> |
Requisition Id |
|
Supplier Row/Supplier/<Value> |
Supplier Record |
|
Details Row/Details/<Value> |
Details |
|
Price Row/Price/<Value> |
Price |
Add an exit Create Purchase Order Record. Create a flow linking the exit to the Handle Database/ trigger.
The model should look as follows:
Zoom into Create Purchase Order Record.
Drag a Purchase Order database record from the repository/outline.
Create a flow linking Purchase Order to the Create Purchase Order Record exit.
The Requisition Id should be set to the Id of the Requisition data structure received through the Requisition Id trigger:
Create a flow linking the Requisition Id trigger to Purchase Order/Requisition Id.
The Supplier Id should be set to the Id of the supplier selected by the user. In our case, the drop-down list was populated with Supplier database records, so we can extract the Id from the selected record:
Drag a Supplier data structure from the repository/outline.
Create a flow linking the Supplier Record trigger to the Supplier data structure.
Create a second flow linking Supplier/Id to Purchase Order/Supplier Id
The Details should be set to the text entered by the user in the popup, which is passed through the Details trigger:
Create a flow linking the Insert Purchase Order/Details trigger to Purchase Order/Details.
The Price should be set to the value entered by the user in the popup, which is passed through the Price trigger:
Create a flow linking the Insert Purchase Order/Price trigger to Purchase Order/Price.
The Date field should be set to today’s date:
Add a Dates/Today.
Create a flow linking Today/<Today> to Purchase Order/Date.
The purchase order’s Status should be set as issued:
Add a Constants/Text. Name it Issued.
Create a flow linking “Issued” to Purchase Order/Status.
The Create Purchase Order Record process model should look similar to the following:

Zoom to Handle Database.
Add a trigger to Insert Purchase Order.
Create a flow linking the Handle Databae trigger to the Insert Purchase Order trigger.
Zoom into Insert Purchase Order.
Create a flow linking the Insert Purchase Order trigger to the Purchase Order database record.
Add Database/Sequence Number. Name it Purchase Order Id.
Create a flow linking Purchase Order Id/<Next> to Purchase Order/Id.
The Handle Database process model should look similar to the following:
Now that the Purchase Order database record is fully populated, we can add it to the Purchase Orders table:
Zoom to Insert Purchase Order.
Add a Database/Insert.
Create a flow linking the Purchase Order data structure to Insert/<Record>.
The Insert Purchase Order process should look as follows:

Now we move to the Update Requisition process. The requisition should be updated with a new status that signifies an order has been issued for that requisition. The requisition’s identifier is available in the Purchase Order record we created, so:
Zoom to Handle Database.
Add a trigger to Update Requisition.
Create a flow linking the Handle Database trigger to the Update Requisition trigger.
Zoom into Update Requisition.
Drag a Purchase Order database record from the repository/outline.
Create a flow linking the Update Requisition trigger to the Purchase Order database record
The Handle Database process model should look similar to the following:

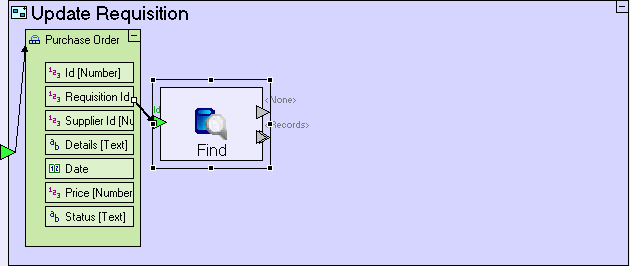
We need to retrieve the requisition from the database and update its status:
Zoom to Update Requisition.
Add a Display/Find. Add a new trigger. Name it Id.
Create a flow linking Purchase Order/Requisition Id to Find/Id.
The Update Requisition model should look similar to the following:
We can reuse Change Requisition Status, a process we modeled in a previous stage (in Manager system/Requisition Approval view/Button Row/Approve Requisition button/Update Requisition process) in order to perform the requisition status update:
Drag Change Requisition Status from the repository/outline.
Create a flow linking the Find/<Records> to Change Requisition Status/Original Requisition.
Add a Constants/Text. Name it Order Issued.
Create a flow linking “Order Issued” to Change Requisition Status/Updated Status.
Finally we need to perform the update in the database:
Add a Database/Update.
Create a flow linking Change Requisition Status/Updated Requisition to Update/<Record>.
The Update Requisition process should look similar to the following:

Now that the database issues are taken care of, we should take care of one last issue – ensuring that Close Window executes only after Handle Database has finished:
Zoom out to Submit Order.
Right-click Handle Database. From the Add Element sub-menu Select the <Done> exit.
Create flow linking Handle Database/<Done> to the trigger of Close Window
The Submit Order process should look similar to the following:

Naming a process’ exit <Done> ensures that it will be activated when the process has completed executing, even though there is no flow (inside Handle Database) activating it. If the exit is named anything but <Done> (or remains unnamed), it will not be activated.
An alternate method to
creating the <Done>
method would be to add a regular exit, and name it <Done>.
You will then need to set the exit's type to Nothing,
by selected Data Types/Nothing and dropping it on the exit.
You can see a slot's type, when you rename it (the type is the Model
Name).
Save your work, and launch the application in a browser.
Click the Purchaser perspective tab.
Click the Issue Purchase Orders view tab.
Select a row from Requisition List.
Click the Order button.
Select a Supplier and enter Price.
Click the Submit Order button.
In the next stage we shall model the display of purchase orders related to each requisition.
Import the sample project Tutorial 13-14 and use it as the basis for the next stage of the tutorial.
For a reminder on how to import a sample project, see the Importing a Sample Project section at the end of Stage 2.
This sample project contains all the functionality modeled thus far.
The sample project also includes additional functionality, as follows:
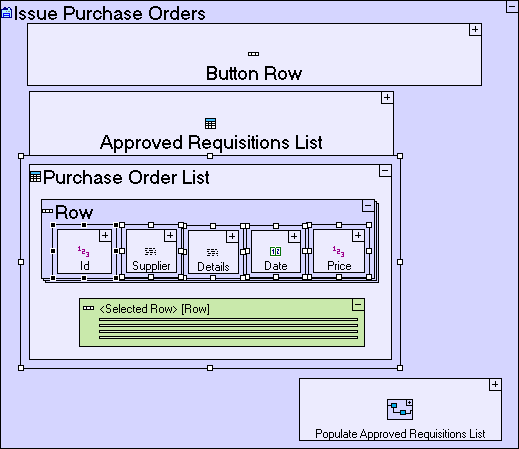
1. Add a second table displaying purchase orders to the Issue Purchase Orders view.
|
How to Model |
Located in |
|
Add Display/Table. Name it Purchase Order List. |
Issue Purchase Orders view |
|
Add a Display/Number Display. Name it Id. Add a Display/Text Display. Name it Supplier. Add a Display/Text Display. Name it Details. Add a Display/Date Display. Name it Date. Add a Display/Number Display. Name it Price. |
Purchase Order List table/Row |
2. Add columns to the Approved Requisitions List table.

|
How to Model |
Located in |
|
Add a Display/Number Display. Name it PO Count. Add a Display/Number Display. Name it Total Price. |
Approved Requisitions List table/Row |
3. Update Generate Approved Requisitions List to include requisitions with status Order Issued.

|
How to Model |
Located in |
|
Replace Find with Database/Advanced Find. Re-link flows from the Advanced Find/<Records> exit. Add 2 triggers; name them Status 1 and Status 2. Link “Approved” to Status 1. Drag “Order Issued”. Link it to Status 2. Add Constants/Text. Name it Status=${Status 1} or Status=${Status 2}. Link it to <Filter>. |
Generate Approved Requisitions List process |
You may now proceed to Stage 14, in which we are going to make use of the Purchase Order List table to display purchase orders linked to the currently selected requisition and calculate purchase order totals for each requisition.
Click here to open the live project in a separate window.